

Clinician: 2×8 or 1×24 In Office Whitening Protocol, Evidence Based
The most defensible in-office whitening protocol uses a moderate hydrogen peroxide concentration, roughly 25 to 35 percent, applied in either a 2×8-minute or a single 24-minute cycle, inside a 60 to 90-minute appointment. Rigorous soft-tissue isolation and a desensitizing agent before dismissal matter more to the outcome than any light unit on the counter. Routine light activation adds little to the chemistry and, in some cases, adds sensitivity you didn’t need to create.
TL;DR:
- A 25 to 35 percent hydrogen peroxide concentration with a 2×8-minute or 24-minute single cycle effectively whitens while limiting pulp penetration, especially when combined with proper tissue isolation.
- Routine light activation provides little benefit and may increase tissue sensitivity, making careful management of the gel and application time more important.
- The most common cause of adverse events is soft tissue contamination, which can be minimized through layered isolation techniques and prompt response if contact occurs.
- Using a desensitizing agent before leaving the chair significantly reduces post-treatment sensitivity without compromising whitening outcomes.
- Shorter, controlled protocols are preferable for sensitive patients or those with thinner enamel, while longer cycles may be suitable when sensitivity is less of a concern.
Table of Contents
- Understanding the In-Office Whitening Protocol Step by Step
- What the Evidence Says About Timing and Concentration Choices
- Protecting Soft Tissue When Isolation Fails
- Reducing Sensitivity and What to Tell Patients Afterward
- Who Actually Benefits From In-Office Whitening
- BLANCA’s Professional Resources for Clinicians
- Where Experienced Clinicians Actually Lose Time (and Patients)
- Get the Gel and Training Built Around This Protocol
- Sources
Understanding the In-Office Whitening Protocol Step by Step
A predictable outcome comes from a predictable sequence. Skipping steps, or reordering them under time pressure, is where most chairside complications start. Here’s the protocol from the moment the patient sits down to the moment they walk out.
- Review medical and dental history. Screen for pregnancy or breastfeeding (defer treatment), active caries, untreated periodontal disease, and known peroxide sensitivity. Any of these should pause the appointment until resolved.
- Capture baseline shade. Use a spectrophotometer or a standardized shade guide under consistent lighting, and photograph the arch. Without this, you have no way to prove the result to the patient or yourself.
- Polish and prep. A light prophylaxis clears surface pellicle so the gel contacts enamel evenly, not a film of biofilm.
- Isolate the soft tissue. Combine cheek retractors with a painted-on resin barrier or a rubber dam, plus cotton rolls and high-volume suction. Protect the patient’s eyes and lips before any gel comes near the arch.
- Mix and apply the gel. Select your concentration, follow the manufacturer’s mixing ratio, and lay down an even 1 to 2 millimeter layer across the facial surfaces, keeping well clear of the gingival margin.
- Run the application cycle. A 2×8-minute protocol (two eight-minute applications with a fresh gel layer between them) or a single 24-minute application are both defensible choices, discussed further below.
- Decide on light activation. This step is optional. If you use a curing or whitening light, tell the patient upfront that the evidence for extra benefit is thin, and monitor for heat buildup.
- Monitor throughout. Watch for gingival blanching, tissue whitening at the barrier edge, or the patient reporting sharp pain. Any of these calls for an immediate pause.
- Manage a barrier breach immediately. Wipe the gel away, irrigate the area with water, and reassess before continuing.
- Rinse and finish. Remove all remaining gel, rinse thoroughly, and take a final shade reading against the baseline.
- Apply a desensitizing agent. Potassium nitrate or sodium fluoride, painted on or worn briefly in a tray, before the patient leaves the chair.
- Document and instruct. Chart concentration, cycle count, timing, any incidents, and the before/after shade. Hand the patient clear aftercare instructions before they stand up.
Pro Tip: Stage your assistant’s role before the patient ever sits down. Have the isolation materials, gel, and desensitizer pre-measured and within arm’s reach. Most chair-time overruns come from searching for supplies mid-cycle, not from the chemistry itself.
What the Evidence Says About Timing and Concentration Choices
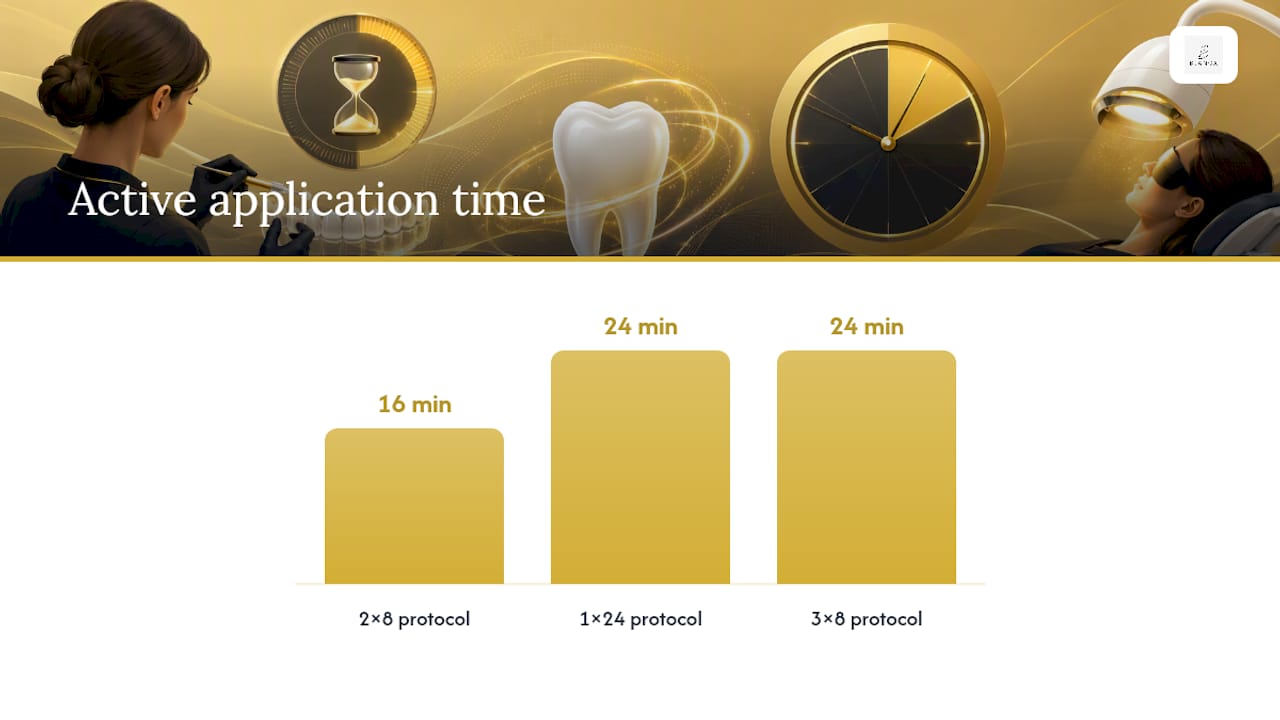
The 2025 study in the Journal of Esthetic and Restorative Dentistry tested eleven application groups across 154 extracted premolars, comparing single and repeated cycles of varying length. The 2×8-minute and 1×24-minute protocols delivered effective whitening while limiting hydrogen peroxide penetration into the pulp chamber. The 3×8-minute protocol showed increased peroxide penetration without a proportional improvement in whitening. More gel time on the tooth doesn’t scale linearly with a better result. It scales with more peroxide reaching tissue you’d rather it didn’t.
A separate umbrella review of systematic reviews and meta-analyses reinforces the concentration side of the decision: moderate hydrogen peroxide concentrations, in the 25 to 35 percent range, produce whitening results comparable to higher concentrations while causing less post-procedure sensitivity. The same review found that routine light activation generally does not add a clinically meaningful improvement, a conclusion echoed by in-vitro and clinical evidence showing some lamps raise pulp temperature without a corresponding gain in color stability.
The trade-off in numbers: the JERD comparison found 2×8 and 1×24 protocols gave the best balance of whiteness gain against hydrogen peroxide penetration, while 3×8 increased penetration without matching whitening gains.
That leaves a practical decision, not a universal rule:
- Choose the 2×8-minute cycle for patients with a known sensitivity history or thinner enamel, since the shorter cumulative exposure limits peroxide penetration while still refreshing the gel once.
- Choose the 1×24-minute single application when the patient tolerates longer exposure well and you want to minimize handling steps and chair interruptions.
- Reserve 3×8-minute or longer multi-cycle protocols for cases where you have a specific clinical reason to extend contact time, understanding the pulp penetration trade-off documented in the JERD comparison.
Neither option requires a light unit to hit its whitening target. If you’re choosing between spending your remaining appointment time on an extra light cycle or a second, careful desensitizer pass, the desensitizer is the better use of your time.
Protecting Soft Tissue When Isolation Fails
Isolation failure, not peroxide concentration, is the most common source of chairside adverse events in in-office whitening. Saliva contamination or a gap in the barrier lets gel migrate onto the gingiva, and irritation follows almost immediately.
Layer your protection rather than relying on one method:
- Cheek retractors hold the lips and cheeks clear of the working field.
- A paint-on resin barrier, cured before gel application, seals the gingival margin.
- Cotton rolls absorb any seepage the barrier misses.
- High-volume suction, run by your assistant, keeps saliva from breaking down the barrier mid-cycle.
If gel does contact tissue, act fast. Wipe the area clean, irrigate with water to dilute and remove residual peroxide, and check the tissue color. Saliva itself neutralizes small amounts of peroxide fairly quickly, and most minor contact resolves within 20 to 30 minutes without further intervention. Chart the incident anyway: what happened, when, and what you did about it.
Pro Tip: Tell the patient before you start that a brief white patch on the gum from minor contact is common, treatable, and not a sign anything went wrong. Patients who hear this in advance stay calm if it happens; patients who hear it for the first time mid-procedure often assume the worst.
Reducing Sensitivity and What to Tell Patients Afterward
Sensitivity is the adverse effect patients remember, and it’s also the one you have the most control over. Applying a desensitizing agent, potassium nitrate or sodium fluoride, before the patient leaves the chair reduces post-procedure sensitivity without cutting into the whitening result. This is a near-universal recommendation across ADA guidance and current clinical practice.
Build the sensitivity plan into the whole visit, not just the last five minutes:
- Recommend a sensitivity toothpaste lead-in for a week before treatment if you know the patient runs sensitive.
- Apply the desensitizer immediately after the final rinse, while the tooth surface is still most receptive.
- Advise the patient on when an over-the-counter analgesic is reasonable, without encouraging routine NSAID use as a first response to expected mild sensitivity.
- Prescribe a white-diet for 24 to 48 hours: no coffee, tea, red wine, or deeply colored sauces, since the tooth surface is more porous and prone to restaining in that early window.
- Suggest a straw and a prompt water rinse if the patient can’t avoid a staining drink entirely.
For maintenance beyond the chair, take-home touch-up products extend the result. If sensitivity runs past the expected window, usually a day or two, that’s the signal to bring the patient back rather than wait it out.
One data point worth repeating to anxious patients: desensitizing agents consistently reduce sensitivity in clinical use without reducing how white the teeth end up. That’s not a trade-off. It’s a step that costs you two minutes of chair time and returns real patient comfort.
Who Actually Benefits From In-Office Whitening
Not every patient in your chair is a good candidate, and saying so upfront saves you a difficult conversation later. Screen out or defer treatment for:
- Active caries or untreated gum disease, since peroxide on inflamed or exposed tissue causes disproportionate irritation.
- Pregnancy or breastfeeding, where the conservative guidance is to defer until afterward.
- Severe existing hypersensitivity that hasn’t responded to a desensitizing lead-in.
- Extensive anterior restorations, where whitening will lighten the natural enamel but leave crowns, veneers, and bonded composite unchanged, creating a visible mismatch.
That last point deserves its own conversation before you ever pick up a gel syringe. If a patient has a bonded central incisor from a childhood injury, whitening the surrounding teeth without discussing restoration replacement sets up a result they’ll be unhappy with regardless of how well the chemistry performed. For patients outside the ideal profile, at-home tray systems, combined protocols, or a restorative approach for intrinsic staining are the more honest recommendation.
BLANCA’s Professional Resources for Clinicians
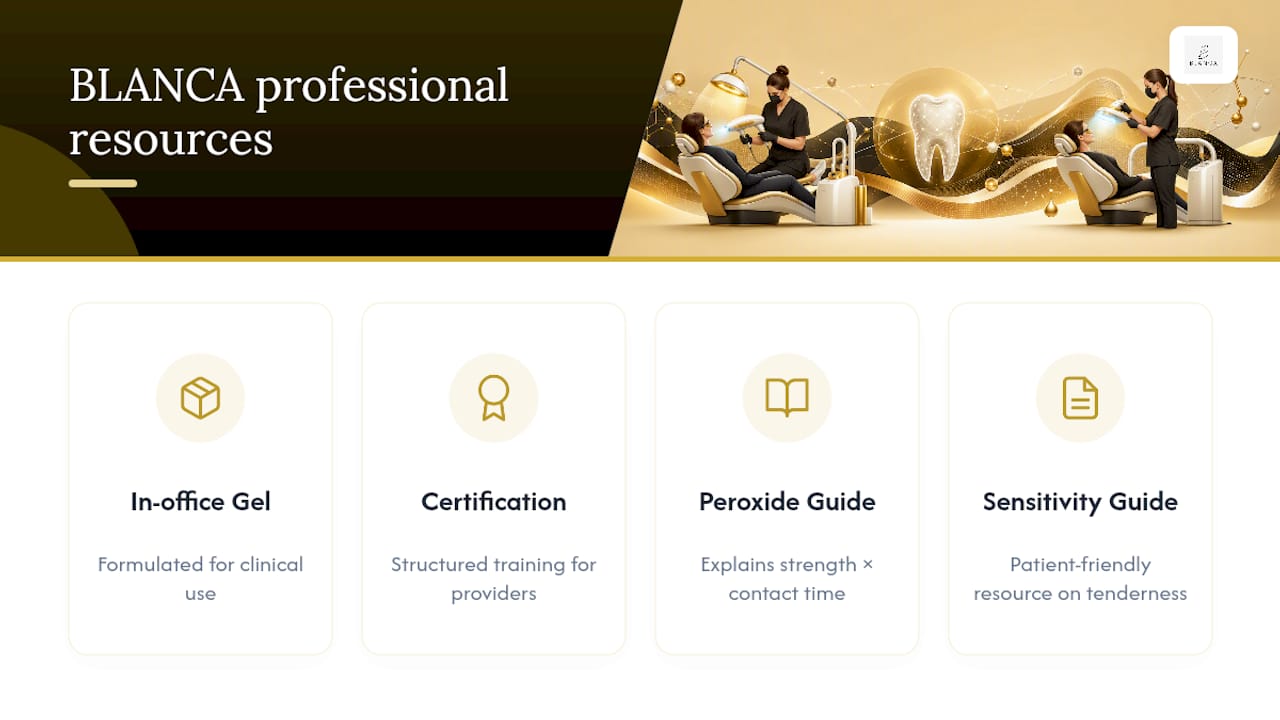
The professional side of the business offers in-office whitening gel formulated for clinical use, alongside a certification course for providers who want structured training in delivering the service. Neither is a replacement for your own clinical judgment on a given patient, but both are built around the same principles laid out in this protocol: moderate concentration, controlled cycle timing, and a heavy emphasis on isolation and desensitizing.
If you’re refining your own approach to concentration selection, our guide to hydrogen peroxide use in whitening breaks down how strength and contact time interact. For patients asking why their teeth feel tender after a previous whitening visit elsewhere, our explainer on whitening without sensitivity gives you a patient-friendly resource to hand over. Specific proprietary clinical outcome data from BLANCA’s own certification cohort isn’t public at this time, and we won’t claim figures we can’t back.
Where Experienced Clinicians Actually Lose Time (and Patients)
The biggest efficiency drain in a whitening appointment usually isn’t the gel cycle. It’s the setup. Clinicians who run a tight, predictable protocol stage their assistant’s role in advance: isolation materials pre-cut, gel pre-measured, desensitizer sitting ready before the first application even starts.
The pitfalls repeat across practices. Over-relying on a light unit to “boost” results stretches the appointment without a proportional gain in whiteness, based on the evidence on light activation. Thin isolation, a retractor with no resin barrier backing it up, is the fastest route to a gingival complaint. And skipping the baseline shade photo because the schedule is tight leaves you with no proof of the result when the patient asks, three weeks later, whether it actually worked.
None of these are complicated fixes. They’re checklist discipline. The protocol works when you run every step, not just the ones that feel essential in the moment.
— Blanca
Get the Gel and Training Built Around This Protocol
A professional line offers clinicians a formulation built for the moderate-concentration, controlled-cycle approach outlined here, without asking you to guess at mixing ratios or cycle timing on the fly. If you’re setting up an in-office whitening service from scratch, or refining one that’s already running, the BLANCA certification course walks providers through isolation technique, cycle selection, and sensitivity management in a structured format, alongside procurement of the professional gel itself.
For patients who need take-home maintenance between in-office visits, BLANCA’s teeth whitening collection and best-selling oral care products give you something concrete to recommend at checkout, rather than sending patients off to guess at a drugstore shelf. If your practice also wants to sharpen the patient consultation process itself, this rundown on cosmetic treatment consultations from a med spa partner covers expectation-setting that translates directly to a whitening consult. Visit the BLANCA professional sales page to order gel or enroll your team in the next certification cohort.
This article is general information, not a substitute for advice from a qualified doctor. Consult a qualified healthcare professional about your own circumstances before acting on anything here.
Sources
- In-office tooth bleaching protocols: an umbrella review of systematic reviews and meta-analyses on whitening efficacy and tooth sensitivity
- Influence of Different Protocols on In‑Office Bleaching: Whiteness Difference and Hydrogen Peroxide Penetration
- Whitening | American Dental Association