

6–8 Weeks to Wedding Teeth Whitening: Dentist Backed, Low Sensitivity
The safest, most reliable route to a wedding-ready smile is a professional cleaning followed by either an in-office whitening session or dentist-prescribed take-home trays, finished 1 to 2 weeks before the wedding with 48 to 72 hours of buffer after any intense treatment. BLANCA’s at-home strips and pens work well for touch-ups around that core plan. See your dentist first, especially if you have sensitivity, decay, or existing dental work.
TL;DR:
- In-office whitening provides the fastest results but has the highest sensitivity risk and cost, best for quick transformations with no sensitivity issues.
- Dentist-prescribed trays deliver gradual, predictable results over one to two weeks and are suitable for sensitive teeth or extended planning.
- Starting whitening four to six weeks before the wedding allows time for sensitivity to subside and results to stabilize before the big day.
- A professional cleaning 6 to 8 weeks in clears away surface stains to improve whitening effectiveness and reduce the need for intensive treatments.
- Over-the-counter strips and pens are ideal for touch-ups and maintenance rather than dramatic whitening changes close to the wedding date.
Table of Contents
- Wedding Teeth Whitening Methods: In-Office, Trays, Strips, and Pens
- When Should You Start Whitening Before Your Wedding?
- Why Preparation and Sequencing Matter Before You Whiten
- Is Whitening Safe? Sensitivity and Realistic Results
- Day-Of Touch-Ups: Quick Fixes That Won’t Backfire
- What Does Wedding Teeth Whitening Cost?
- Why We Built BLANCA Around Dental Expertise, Not Guesswork
- The Right BLANCA Products for Your Wedding Timeline
- Sources
Wedding Teeth Whitening Methods: In-Office, Trays, Strips, and Pens
Every whitening method relies on the same two active ingredients, hydrogen peroxide or carbamide peroxide, but the concentration, delivery, and speed vary enormously. Choosing the right one depends on how much time you have and how your teeth typically react.
- In-office whitening uses higher-concentration peroxide gel, often activated with LED light, and delivers the fastest, most dramatic shade change in a single appointment. It’s the most predictable option but also the priciest and carries the highest short-term sensitivity risk.
- Dentist take-home trays use custom-fitted trays with a moderate peroxide concentration worn daily over one to two weeks. Results are gradual but consistent, and a dentist controls the formula strength to match your tolerance.
- Over-the-counter strips and pens, like BLANCA’s at-home whitening strips, use lower peroxide levels for smaller, incremental improvements. They’re ideal for touch-ups rather than dramatic transformations.
- Whitening toothpastes rely on mild abrasives and low-dose peroxide to lift surface stains, not the underlying tooth color, so they maintain results more than they create them.
If your wedding is months away and you tend to have sensitive teeth, dentist trays give you control without the intensity of an in-office session. If you’re on a tight deadline and have no history of sensitivity, in-office treatment gets you there fastest. Learn more about the tradeoffs in our professional versus at-home whitening guide.
When Should You Start Whitening Before Your Wedding?
Shade change isn’t instant, and neither is recovery from sensitivity. Building in the right buffers protects both your comfort and your final result. The ADA’s MouthHealthy guidance recommends scheduling professional whitening roughly a month out so sensitivity has time to settle before the big day.
- 6 to 8 weeks before: Book a dentist consult and professional cleaning. A cleaning alone often brightens teeth noticeably by removing surface stains, which can reduce how much whitening you actually need.
- 4 to 6 weeks before: Start your chosen whitening method, whether in-office, trays, or a BLANCA whitening kit at home. Bridal experts generally point to this same 4 to 6 week window as the sweet spot.
- 1 to 2 weeks before: Do your final touch-up, then stop active whitening several days before key portraits or the ceremony itself to let shade and sensitivity fully stabilize.
If you’re down to two weeks or less, don’t panic and don’t overdo it. A single in-office session paired with a gentle at-home strip for touch-ups is realistic; just expect a moderate improvement rather than a dramatic one, and skip anything aggressive that risks visible irritation on the day.
Why Preparation and Sequencing Matter Before You Whiten
Whitening gel can’t do its job through a layer of plaque or tartar, which is why a professional cleaning always comes first. Removing that buildup lets the peroxide reach the enamel surface evenly, which is also why skipping the cleaning step tends to produce patchy, disappointing results.
Sequencing matters just as much if you have restorative work planned or in place. Whitening should happen before any new crowns or veneers, since bleaching doesn’t change ceramic or resin, and dentists typically recommend a two-week stabilization period after bleaching before matching a restoration’s shade.
- Book your cleaning and exam 6 to 8 weeks out, not the week of.
- Flag any existing crowns, veneers, or fillings to your dentist before starting.
- Watch for red flags like bleeding gums, visible decay, or exposed roots and get those treated first.
- Read up on whitening safely after dental work if you have any restorations.
Pro Tip: Ask your dentist to check for exposed root surfaces before you whiten. Roots lack the enamel layer that buffers sensitivity, so whitening over them can cause discomfort that’s easy to avoid with the right exam.
Is Whitening Safe? Sensitivity and Realistic Results
Tooth sensitivity is the most common side effect of peroxide-based whitening, and it’s almost always temporary. Peer-reviewed research on tooth whitening confirms that transient sensitivity typically appears within 24 to 72 hours of treatment and resolves on its own.
You can reduce the odds of discomfort before it starts. Desensitizing ingredients like amorphous calcium phosphate (ACP) and potassium nitrate work by calming the nerve signals inside the tooth, and many dentist-supervised kits include them for exactly that reason.
- Use a desensitizing toothpaste for a few days before and after whitening.
- Space out sessions rather than whitening every single day.
- Pause immediately if you notice sharp or lingering pain, and call your dentist.
- Talk to your dentist first if you’re pregnant, have active decay, or have exposed roots, since these situations need extra care or a delayed approach.
Pro Tip: If sensitivity hits mid-plan, switch to a desensitizing toothpaste for 48 hours before your next session rather than pushing through. Our guide to whitening without sensitivity breaks down exactly which ingredients help most.
Day-Of Touch-Ups: Quick Fixes That Won’t Backfire
The days right before your wedding are for maintenance, not experimentation. Stick to what you’ve already tested and tolerated well.
- Pack a pre-tested whitening pen or a single-use strip you’ve already tried, never a brand-new product.
- Use a whitening toothpaste the morning of for a quick surface polish.
- Build a small emergency kit: floss, a compact mirror, and your whitening pen.
- Follow a 48 to 72 hour white-diet window: skip coffee, red wine, and dark sauces, sip staining drinks through a straw, and choose lighter sauces at the rehearsal dinner. Our eating guide for before and after whitening has more swaps.
If unexpected sensitivity or a stray stain shows up right before photos, stop whitening entirely and rinse with water. Do not try a new product to “fix” it on the spot.
What Does Wedding Teeth Whitening Cost?
Cost tracks fairly closely with speed and predictability. In-office treatments sit at the top of the price range because you’re paying for a controlled clinical setting and same-day results. Dentist-prescribed take-home trays cost less than in-office visits but more than shelf products, and they still offer dentist-level formula control. Over-the-counter strips and pens are the most affordable option and work best as maintenance rather than a primary transformation tool.
Before committing to any option, ask a few questions:
- Does the product carry the ADA Seal of Acceptance or clear peroxide concentration labeling?
- What’s the return policy if sensitivity becomes a problem?
- Is the price reflective of dentist supervision, or just packaging?
Spending more generally buys you predictability and lowers the risk of a last-minute surprise, which matters more the closer you get to the wedding. If your timeline is relaxed and your teeth have shown no sensitivity history, a budget-friendly at-home plan is a perfectly reasonable choice. Our safety questions guide walks through what to ask before you book anything.
Why We Built BLANCA Around Dental Expertise, Not Guesswork
BLANCA was founded by dental professionals who saw too many brides and grooms chasing dramatic results with products that ignored the basics of enamel science. That clinical foundation shapes every formula we make, from strip concentration to desensitizing agents. For deeper guidance on timing your whitening around your wedding, our timeline resource and photo-ready results guide go further than this article can.
— Blanca
The Right BLANCA Products for Your Wedding Timeline
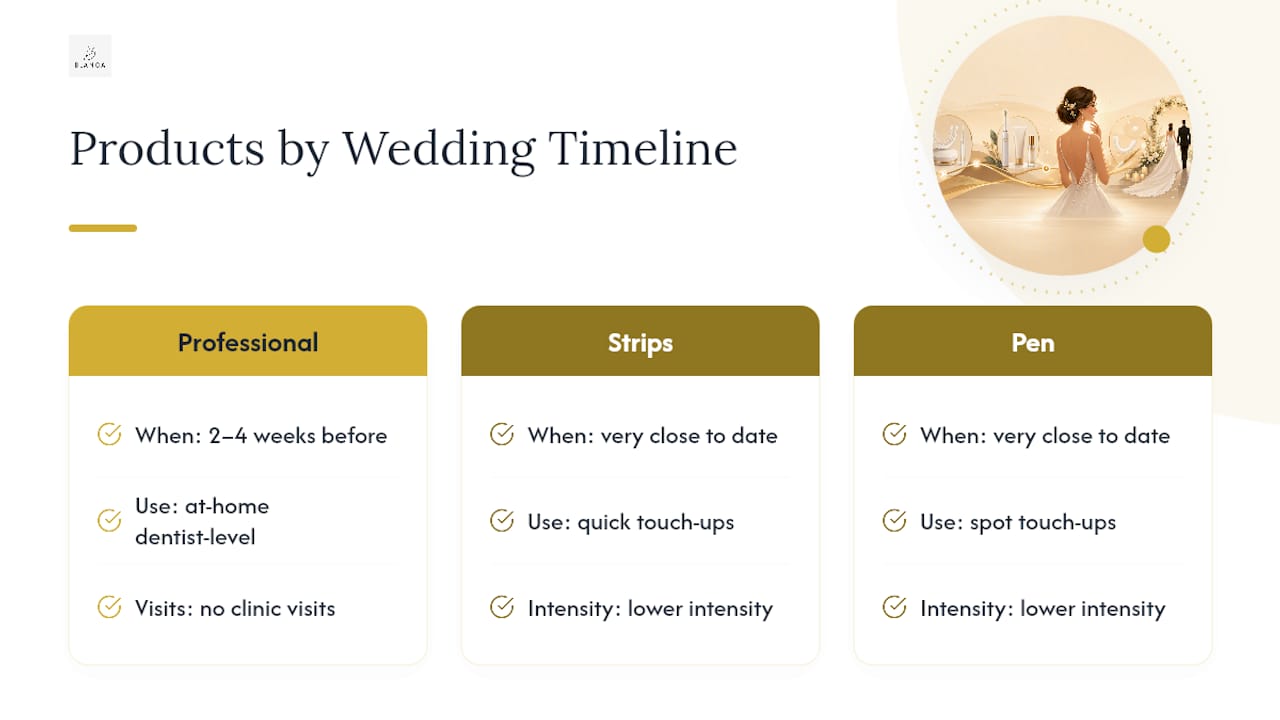
Blancawhitening is the practical middle ground between a full in-office appointment and a shelf-brand strip with no clinical backing behind it. If your wedding is 2 to 4 weeks out, the BLANCA professional whitening kit gives you dentist-caliber concentration you can use at home, without booking multiple clinic visits. If you’re closer to the date and just need to maintain a shade you already like, the BLANCA at-home whitening strips or a BLANCA whitening pen handle quick touch-ups without the intensity of a full treatment.
Whichever product you choose, patch test it a few days before relying on it, follow the directions exactly as written, and check with your dentist first if you’ve had sensitivity before. If you’re advised to stop whitening 48 to 72 hours before your ceremony or photos, treat that window as final. Browse the full BLANCA whitening collection now and build a plan around your actual wedding date, not a generic countdown.
Sources
Claims in this article draw on MouthHealthy’s wedding whitening guidance, peer-reviewed research on peroxide safety, and clinical timeline protocols from HCMC Dental. For more on preventing side effects, see our guide on preventing gum irritation while whitening.
This article is general information, not a substitute for advice from a qualified doctor. Consult a qualified healthcare professional about your own circumstances before acting on anything here.
- 10 Tips for Achieving Perfect Teeth by Your Wedding Day | Brides
- Peer-reviewed journal article on tooth whitening (PMC)
- Wedding Teeth Whitening Package: Clinical Guide & Timelines | HCMC Dental